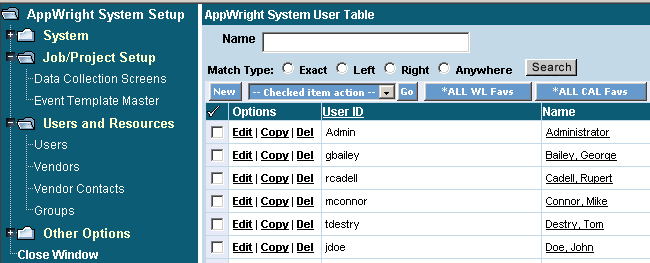
A new user can be added through the AppWright System Setup on the desktop. In System Setup you will see an option named Users and by selecting this a list of existing users will be displayed. A new user can be added two ways; by copying an existing similar user or by creating a new entry. If copying an existing user care should be taken that all fields are reviewed to make sure there are no incorrect settings for the new user.

To copy an existing user simply select Copy to the left of the user's name. The new user's ID, password, user name as well as email name and address will need to be added at this point. If no other changes are required, then once this new user ID is saved they can log into the system.
A new user can also be added by selecting
the  button near the top left of the screen. The
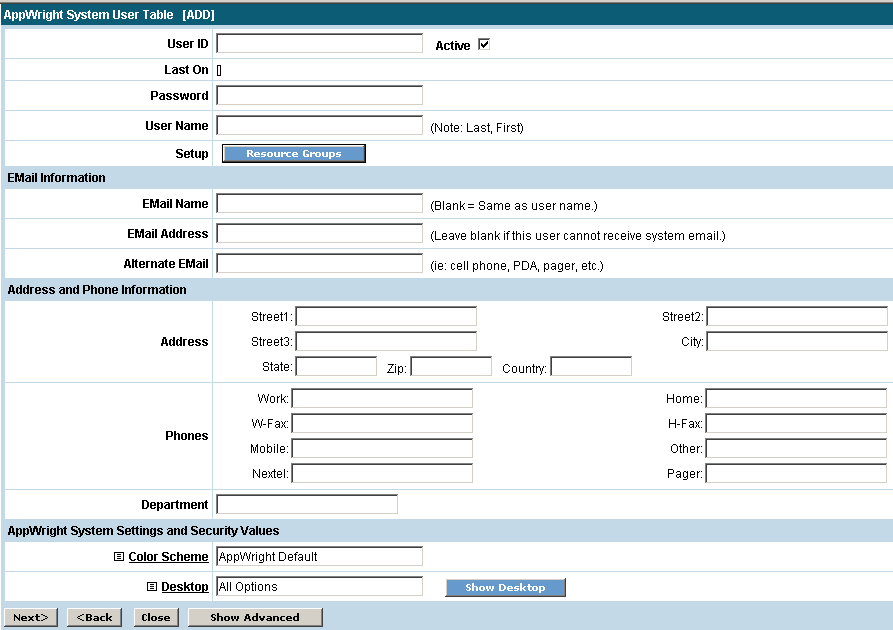
screen shown below will be displayed.

User ID
The user ID should be entered here. The Active box is checked by default and should be unchecked if the user should not be allowed instant access to the system.
Password
A user password should be between 1 and 25 characters.
User Name
The user's full name should be entered here in the recommended Last, First name format. This is what is displayed throughout the system.
EMail Information
EMail Name
What is entered here will be displayed in the email listing when sending messages. This will default to the user name if left blank.
EMail Address
Enter the user's email address in this field. If this is left blank the user will not be able to send or receive messages from AppWright.
Alternate EMail
A cell phone, PDA or pager number can be entered here. If there is an alternate email number a text message will be sent.
Address and Phone Information
Address
Address information for the user can be entered here.
Phones
Phone, cell, fax, Nextel and pager numbers can be entered here for the user.
Department
If a user is assigned to a department it can be entered here.
AppWright System Settings and Security Values
Color Scheme
A color scheme can be selected for the appearance of the user's desktop. By clicking on Color Scheme, color options will appear that can be chosen. Every time a user logs into AppWright their color scheme will be used.
Desktop
Different desktops can be set up for different users, meaning some users may need different options on their desktop verses others. Once desktop settings are set up in the system they can be selected here for a user. The Show Desktop button will give a preview of the chosen desktop to verify it is correct.
If the  button is selected
a few more options will be shown.

Resource Any item that can have work assigned to it. Examples: Personnel, equipment, places,work queues Availability Settings
Calendar
Calendars can be set up for different availability for different users or resources. Examples would be a Standard calendar for a five day workweek with an eight hour workday. Another example would be a workweek including Saturdays. The calendar that applies to this user should be selected here.
Availability Level
This setting tells the system how many resources are available for a resource type when setting up queues. For example, an entry of 1 here will mean there is one person available to work jobs whereas an entry of 10 would mean there are many more people available when scheduling multiple jobs for the resource. In this case, since we are setting up a single user, the setting would be one.
Standard Day
Enter the number of hours a standard workday for this user.
Zip Code
Enter an optional zip code for this user here. Distance calculations can be set up for tasks to determine who is most easily accessible based on location.
AppWright System Settings and Security Values
System Setup Tables
This setting will determine what access level to the AppWright System Setup tables this user will have. The default is No Access.
Advanced Settings
Select Yes if the user would prefer to
have advanced settings shown by default instead of having to click the
 button.
Export Data
This setting will allow this user to use the export functions to save data to their local PC.
Internal Messages
This option will allow this user to send messages to other internal users in the Users list in AppWright.
External Messages
This setting will allow this user to send and/or receive messages from external vendors or accounts and contacts. By selecting Yes here, this user's name will be shown in the recipient box for accounts to select for job messages.
Click
the  button to continue. Shown
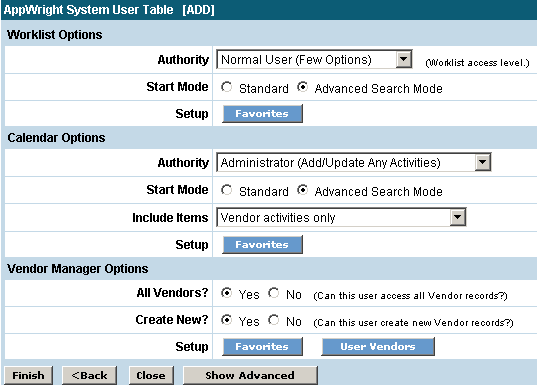
below is the next screen in user setup.

Worklist Options
Authority
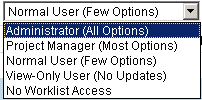
The options shown here can be selected to determine a user's security level when accessing the Worklist. The following describes the different levels of security and the actions an internal user will be able to perform with that security level:

No Access:
No options, no Worklist access
View Only:
Worklist viewing, but no update options
Normal Users:
(all previous options plus...)
Re-Assign To Me
View Task Info
Change Pct Complete
Mark 100% Yesterday
Mark 100% Complete
Mark 75% Complete
Mark 50% Complete
Mark 25% Complete
Project Managers:
(all previous options plus...)
Re-Assign
Change Task Duration
Change Active State
Change Due-Date
Change Due-Date/State/Visibility
Change Priority
Change Task Details
Change External Visibility
Add Task/Resource
Reschedule Job
Add On Job
Copy as New Job
Clone Job
Worklist Administrators:
(all previous options plus...)
Delete Task
Delete Entire Job
Start Mode
Choose between Standard or Advanced Search Mode to have the Worklist display the search options preferred by default. Advanced Search Mode will display all search options available in the Worklist. Standard will hide the extra search criteria selections.
Setup
By clicking on the Favorites button the user's Worklist views can be selected or created. Worklist views, or favorites, are saved searches of different ways a user can have the data in the Worklist displayed. If a certain search is needed regularly it can be saved in the Favorites list and made available for the user when they access the Worklist by assigning it to them here.
Calendar Options
Authority
 The
options shown here can be selected to determine a user's security level
when accessing the Calendar.
Administrator - The user will have full access in the Calendar and be able to add new activities or update existing activities.
Normal User - The user will have full access to their Calendar activities only.
View-Only User - The user will not be allowed to update or edit Calendar entries but will be able to view them.
No Calendar Access - The user will not have access to the Calendar.
Start Mode
Choose between Standard or Advanced Search Mode to have the Calendar display the search options preferred by default. Advanced Search Mode will display all search options available in the Calendar. Standard will hide the extra search criteria selections.
Include Items
 Select
the setting preferred for the default view of the Calendar. Vendor
activities and/or Worklist tasks can be chosen.
Setup
By clicking on the Favorites button the user's Calendar views can be selected or created. Calendar views, or favorites, are saved searches of different ways a user can have the data in the Calendar displayed. If a certain search is needed regularly it can be saved in the Favorites list and made available for the user when they access the Calendar by assigning it to them here.
Vendor Manager Options
All Vendors?
Select Yes or No to determine if the user will be allowed to have access to all Vendor records in the system or only the vendors assigned to this user. If Yes is chosen then the user will be able to view all vendor accounts and contacts.
Create New?
Select Yes or No to determine if the user will be allowed to create new vendor accounts and add contacts.
Setup
By clicking on the Favorites button the user's Vendor Manager views can be selected or created. Vendor Manager views, or favorites, are saved searches of different ways a user can have the data in the Vendor Manager displayed. If a certain search is needed regularly it can be saved in the Favorites list and made available for the user when they access the Vendor Manager by assigning it to them here.
By clicking on the User Vendors button the accounts the user is allowed to view and have access to can be set up. An account is chosen by simply putting a checkmark next to the account name or by clicking the New button and adding a vendor to the list. The email notification settings for the user can be assigned here as well for each account.
If the  button is selected
more options will be shown.
Shown below are the Advanced settings for the Worklist Options.

Task View
Job View
Default Date Range
Track Jobs
Purchase Orders
Create Jobs

Below are the Advanced settings for the Calendar Options.

Activity Status
Default View
 Select
the preferred default view for the calendar.
Below are the Advanced settings for the Vendor Manager Options.

Account Authority
 Select
the access level this user should have regarding the Vendor Manager.
Contact Authority
 Select
the access level this user should have regarding Contacts.
Note Authority
 Select
the access level this user should have regarding notes for vendors and
contacts.
Document Authority
 Select
the access level this user should have regarding documents for vendors
and contacts.
The final selections for the User setup are shown below.

User Defined Data Collection Screen Security
Access Level
Individual fields on the data collection screens can be set to be viewable only if the user's access level is equal to or above the security level assigned to that field. This setting will define what fields this user is allowed to view on the data collection screens.
New Order Level
Default Settings for Automatic Email Notices for New Vendors Added by this User
Order, Complete, Discussions, Notes, Documents
The settings for email notifications for vendors assigned to this user are defined here.
When all setup information is complete
click the  button to add the new user to the system. The
user will then be allowed to log in and have access to the system.