 field.
AppWright
has the capability of keeping track of all your contacts for accounts
entered into the system. The
Contacts can be accessed directly from the desktop and will appear similar
to the following image. A
contact can be accessed by simply typing in the name in the field.

Direct links to Vendors, Activities, Jobs and the Calendar are located in the top right corner.
 These
icons will export the contact information to your Outlook address book
or to an Excel spreadsheet.
These
icons will export the contact information to your Outlook address book
or to an Excel spreadsheet.  This icon will export an abbreviated list of the contact
information containing just the account and contact name, address, phone
number and email address.
This icon will export an abbreviated list of the contact
information containing just the account and contact name, address, phone
number and email address.
To add a
new contact click  and a screen similar to the one below
will be shown.
and a screen similar to the one below
will be shown.
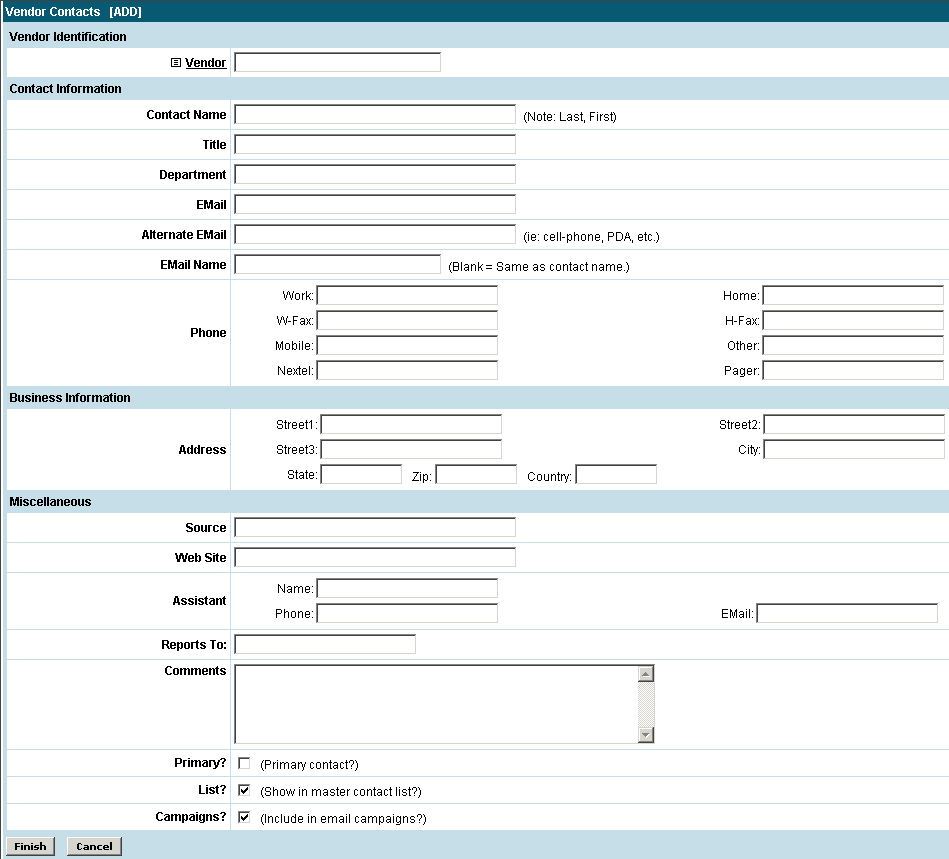
Vendor Identification
Vendor
Enter a vendor ID for the contact here.
Contact Information
Enter the name of the new contact. This can be followed by additional information for the contact including their title, department, email address and phone numbers.
Business Information
Enter the address information for the contact here.
Miscellaneous
Additional optional information can be entered here regarding the source for finding this contact and web site address.
Primary
An account can have several contacts. If this contact is to be the primary contact for this account this box should be checked.
List
This should be checked if the contact should be listed on the master contact list on the desktop.
Campaigns
An email campaign can be done in AppWright to send a message to all contacts at once. If this contact should be included in an email campaign when one is done then this box should be checked.
When all information
is entered for the new contact click the  button to save.
If the
account this contact belongs to is set up to allow logging in to AppWright
then some additional information will need to be entered for this contact.
button to save.
If the
account this contact belongs to is set up to allow logging in to AppWright
then some additional information will need to be entered for this contact.
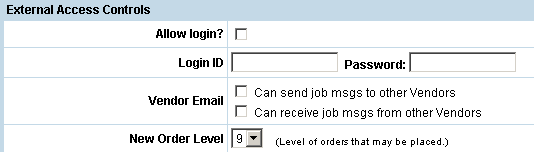
External Access Controls
Allow login?
This should be checked if this contact will be allowed to log into AppWright.
Login ID and Password
Enter the login ID and password this contact will use.
Vendor Email
If this contact will be allowed to send and/or receive messages from other Vendors then these boxes should be checked.
New Order Level
If this contact will be placing orders in AppWright then a level can be assigned to them to determine the type of order they can place when logged in.
When all information is entered for the new
contact click the button to save.
Once a contact is added it can be searched for and selected. At this point notes and documents can be attached to the contact.
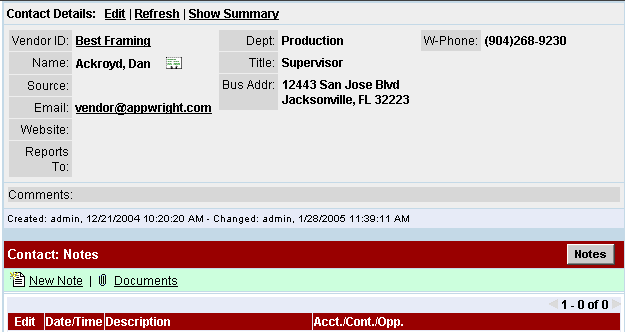
 By
selecting New Note you have a place to add notes to this contact. By
selecting Documents you will be able to upload and attach forms, spreadsheets
or any other document that should be saved with the contact.
By
selecting New Note you have a place to add notes to this contact. By
selecting Documents you will be able to upload and attach forms, spreadsheets
or any other document that should be saved with the contact.