 button.
Event Templates are used in the system to describe a “shell” or outline of an event. The event template A list of task definitions that contain the definition of how a new event is to bescheduled in the system. Event templates describe what tasks depend on other tasks,the average duration of each task and the manner in which resources are chosen forassignment to each task in the event. is simply a list of task definitions that contain the details of how a new event is to be scheduled in the system. Event templates describe what tasks depend on other tasks, the average duration of each task and the manner in which resources are chosen for assignment to each task in the event. The Event Template Master contains general information about the event, while Event Template Tasks define each step in the event.
In AppWright system setup you will want to
select Event Template Master to create a new template. The
screen you will see next will be similar to the one below after clicking
on the  button.

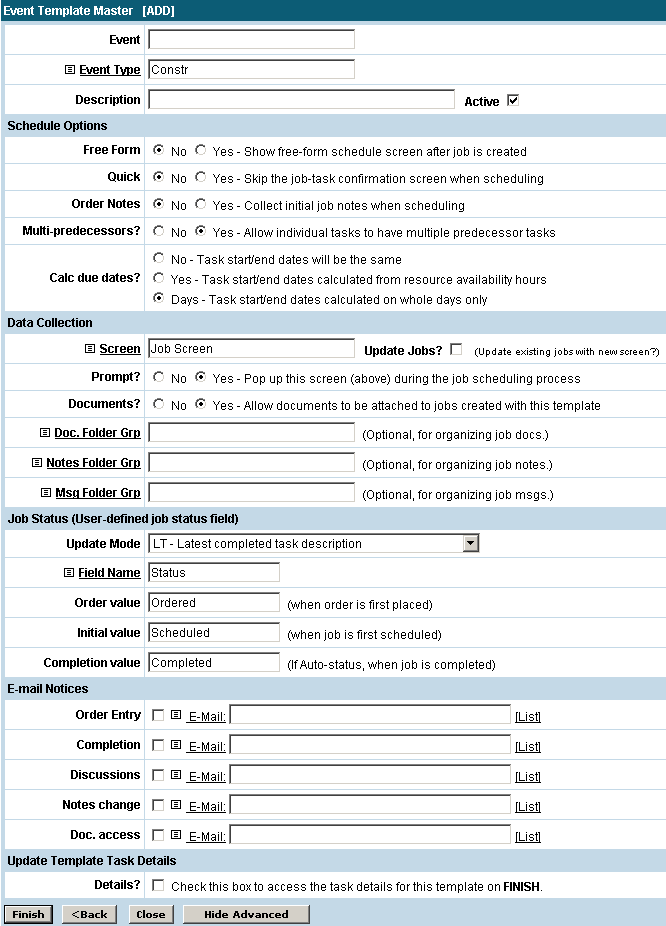
Event Template Master (Add)
Event
Enter the name of the template.
Event Type A grouping (or classification) for similar event templates.
Choose an event type here. Examples of event types may be pre-construction, construction and warranty.
Description
A field for additional descriptive information regarding the event. The event name will fill in here if no description is entered. If this is an active template and can be used to schedule jobs then the Active box will need to be checked.
Schedule Options
Free Form
Quick
Select Yes or No to determine if the job confirmation screen should be shown or skipped during the job scheduling process. The job confirmation screen is a screen that lists the tasks for the job and gives the user a chance to verify that all dates for the tasks of the job are correct.
Order Notes
The ability to add job notes at the time of scheduling is turned on or off here.
Multi-Predecessors
The default setting for this option is No. Tasks do not truly have more than one predecessor set up in the system.
Calc due dates?
Data Collection
Screen
Select which data collection screen should be used with this template. The Update Jobs? checkmark would be used if you are changing the data collection screen to a new one. It will replace the data collection screen with the new one as well as update any existing jobs with the new screen.
Prompt?
Select Yes or No to determine if the selected data collection screen should show during the scheduling process.
Documents
Select Yes or No to determine if documents should be attached to the job or not.
Doc. Folder Grp
Notes Folder Grp
Msg. Folder Grp
Job Status (User-defined job status field)
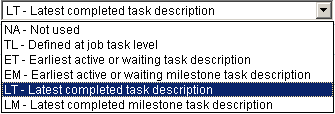
Update Mode
There are several ways to determine how the status of a job is defined. Generally the description of the last completed task is used when displaying the status of a job in the worklist. Choose which setting is preferred from the dropdown box.

NA = No status field information will be displayed
TL = The status field will display a status that is defined in the event template task setup screen for each task
ET = The status field will display the earliest active or waiting task description
EM = The status field will display the earliest active or waiting milestone task description
LT = The status field will display the latest completed task description
LM = The status field will display the latest completed milestone task description
Field Name
The field from the data collection screen that will display the status is entered here.
Order Value, Initial Value, Completion Value
Enter the status you wish to be displayed when the order is first placed, when the job is first scheduled and when the job is completed. For example, Ordered, Scheduled and Completed could be used.
Email Notices
Email notices can be sent for different occasions of the job. A user's email can be chosen to be notified of Order Entry, Completion, Discussions, Notes change and Doc. access. An email list can be selected as well which will notify several people at once.
Update Template Task Details
Details?
Check this box to move on to the task creation screen after saving the setup.
When all information is entered for the new
template click the  button to save and move on to the task
creation screen. By
clicking on the
  button you will see the screen below.

Event and Task Identification
Sequence
Each step (task) in an event must be given a unique sequence number. This sequence number will be used throughout the definition of event tasks to indicate the relationship(s) between one task and another.
Task Description
Each task must be given a task description to be shown in the WorkList. If this task description is one that can be changed when a job is scheduled then you will want to check the Allow Change? box. At the time of scheduling this task will have a place to enter the new task description.
Task Alias
This is an optional field for entry of a shortened version of the task description which will be used when logging into AppWright with a PDA etc.
Task Status Options
Secure Close?
If this is checked then only worklist administrators will be allowed to close this task or mark it 100% complete. Usually this is checked on a final task of a job to ensure the job is not closed until an administrator has reviewed it first.
Milestone
This box should be checked if this task is to be considered a milestone task. A milestone task will show up in blue bold text so it is easily recognizable from the other tasks in the list. A completed milestone task usually marks when an important goal has been reached in the job.
Resource Any item that can have work assigned to it. Examples: Personnel, equipment, places,work queues Identification/Selection
Source
Each task in an event will eventually be assigned to one resource in the system during the scheduling process. The dropdown selection next to Source is used to define what the “source” of this resource should be (during scheduling).

1 = One specific resource: This option means just what it says; you will name a specific resource on this screen which will always be assigned to this task in this event during the scheduling process.
G = Select from a group of resources: If this option is chosen, you will be asked to identify a named resource group. All members of this group will be presented to you in a list during the scheduling process where you must then select the appropriate resource to assign to the task.
C = Copy a previous resource selected in this event: Choose this option to use the same resource that was assigned to a previous task. You will be asked to identify (by sequence number) the prior task that you wish to copy from. At scheduling time, whatever resource is assigned to the "copy from" task will also be assigned to this task automatically.
R = Use additional resource selection criteria rules: To build complex selection criteria involving and/or relationships between members of resource groups and possible zip code based distance measurements, use this option. You will be given a button to access the selection criteria construction screen and to enter an optional zip code mileage limit, if desired.
P = Prompt for a single resource during scheduling: This option is most commonly used for the customer identification record in an event. During scheduling you can select a single resource from a selection window, though it will generally already be filled in from information in the order screen.
Depending on which option is selected more choices will be given to assign a resource from a group or type. To Allow Change? of these settings at the time of scheduling then just check the appropriate box.
Once you
have completed your settings you will want to select the  button at the bottom left corner. You
will then see a screen similar to the one below.

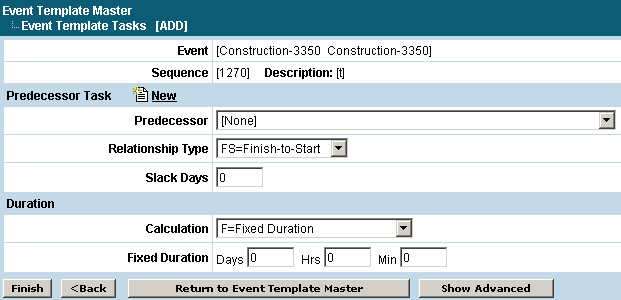
Predecessor Task
Predecessor
The first thing you will want to select on this screen is the Predecessor, which is the task that should be completed before the start of the current task.
Relationship Task
 The Relationship Type should be defined next. There
are several options for the relationship type which will define how the
predecessor task should trigger the current task. In
the illustration “Finish to Start” is selected. This
would mean the finish of the predecessor task will trigger the start of
the current task.
Slack Days
The Slack Days is how many days between the predecessor task and the current task (this is based on the relationship type selection). In the screen above, the “Slack Days” is 1 with a “Finish to Start” relationship type. This will start the current task 1 day after the finish of the predecessor task.
Duration
Calculation
 Under the Duration heading you will need to fill in the Calculation
field.
Fixed Duration - will simply let you input the length of time the task should take to be completed.
Variable by Input [Time] - will prompt you for the duration when entering a new job.
Use Input from Previous Task - will display a dropdown field that will let you select a previous task to copy the duration from.
When all
information is entered, click on the  button at the bottom
left corner of the screen.
By following this process, tasks can be entered one following the other until the template is complete. Tasks can be moved up or down in the template at any time by simply changing the predecessor. The sequence number can be changed as well but this is not necessary. The “Auto Sequence” button on the top of the task list screen will renumber the tasks. The “Check Relations” and “Test Schedule” buttons, also located on the top of the task list, will notify you of any relational problems between the tasks and allow you to run through a test order to view the template.
