
The following is a brief overview of the worklist and some of its features.
What You Can See and Finding Jobs
a) Each row is a task from a job (a.k.a. house) that you have been given. Look across the columns to see what task it is (Task) and the lot ID (Lot). Other columns are:
1) Ref # - a number assigned by the system
2) Pct Complete – how far along the task is
3) Start & Due Dates – scheduled dates for the job
4) Buyer – buyers name if there is one.
5) The health levels are denoted with
these icons: 


 . The
levels go from blue to spinning red with blue being the best and spinning
red being the worst. Any
task that is over-due will show as spinning red.
. The
levels go from blue to spinning red with blue being the best and spinning
red being the worst. Any
task that is over-due will show as spinning red.
6) The column headed with a  icon
indicates what percentage of the task is completed. The
column will display a numerical percentage and a little blue progress
bar under the number as seen in this image
icon
indicates what percentage of the task is completed. The
column will display a numerical percentage and a little blue progress
bar under the number as seen in this image  .
.
7) The task status column denoted by
a  icon
displays the task’s current status. The
following are some task status icons you may see and their descriptions:
icon
displays the task’s current status. The
following are some task status icons you may see and their descriptions:
 = active,
  = waiting,
  =
ordered but not scheduled,
=
ordered but not scheduled,  = inactive.
b) The collaborate column has four icons:

1) The first icon will take you to the notes section where you can view notes from other users regarding this task.
2) The second icon will allow you to attach documents to the task as well as view certain items that have been placed there such as color sheets, option sheets, etc.
3) The third icon takes you to the message center where you will be able to communicate regarding the job.
4) The fourth icon will show you a general information screen of the job.
c) This area contains ways to search for individual jobs/tasks.
1) You can type in a date range to view jobs in.
2) The system defaults to show only those jobs that are still active. To view jobs that have been completed you must check this box.

3) The Go/Refresh button must be clicked to complete a new search.
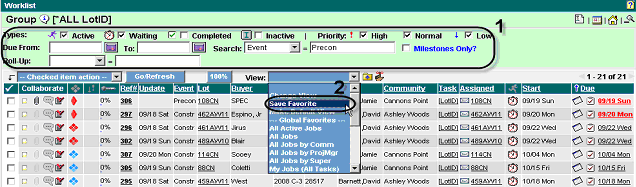
d)  Favorites, or Views, are a way to view tasks in the system.
Choose
from the list the view you wish to see. Typically, you will want to select
“My Jobs Summary”, which will give you a single line for each job that
belongs to you. A
favorite view can be made to be the default by clicking on the
Favorites, or Views, are a way to view tasks in the system.
Choose
from the list the view you wish to see. Typically, you will want to select
“My Jobs Summary”, which will give you a single line for each job that
belongs to you. A
favorite view can be made to be the default by clicking on the  icon.
Favorites
can be managed by clicking on the
icon.
Favorites
can be managed by clicking on the  icon.
icon.
1) To create a new favorite you would first select the criteria at the top of the Worklist screen to return the view you wish to see.
2) Click on the View dropdown box and select “Save Favorite” as shown below.
Completing Tasks
a) Once inside a job you will see a screen like the one below. To mark a task as completed, this is where you need to be.
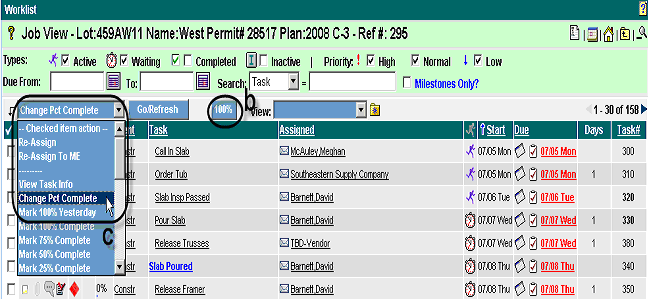
b) Find the task you want to work with by scrolling through the pages or by using the search function. Once you find the task, the quickest way of completing it is to use the 100% button. First, put a check mark in front of the task you are working with, then click the 100% button and you are done.
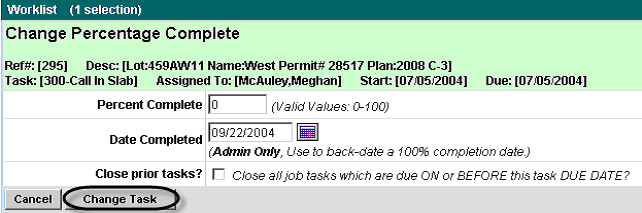
c) To change the percent complete for tasks that aren't quite 100%, put a check mark in front of the task, choose the “Change Pct Complete” option from the “Checked Item Action” drop down box and click the “Go/Refresh” button. You will be given the screen shown below in which all you need to do is input a percentage and click the “Change Task” button.
d) To backdate a completed task there is a “Date Completed” field to select the date. Click the “Change Task” button when finished.
Changing Dates
There are 2 ways to change the start/due date of a task. Once you have located the task you can:
1) Click the due date that is associated with the task.
2) Select a task and then select the Change Start/Due Date option from the Checked Item Action menu.

Once you have made your selection the following screen will appear.

To change dates using this screen, complete the following steps:
1) Select a new date by clicking on the correct date in the “Pick New Date” section or by typing it in the “New Start Date” section.
2) Change the options if needed.
* The options default to move dependent tasks only. (Those that directly depend on the task you are changing). This will be the standard choice.
* You may also choose to “simple move” which will move any task, with a start date after this task, by the same number of days.
* By leaving both boxes unchecked you will just move the due date of the selected task and not any related task’s due date.
3) Click the “Change Task” button.
General rules for changing dates:
When changing dates due to the fault of a vendor, change the date on the task that depends on the late task. Leave the actual late task alone. This will give a better history of what actually happened and the vendor will keep seeing the task as overdue.
If changing dates because of internal reasons or weather, choose the first active task. (This is just a suggestion and since you know your schedule better than anyone, you must decide whether or not the dates actually need to be changed.)
Messaging
To send a message, find the job and click
on the  link.
You will then see the screen below.
link.
You will then see the screen below.
1) Select the recipients for the message. The left box, Recipient List, shows the list of names that will receive the message and the right box, Select More Recipients, lists the other names available. Highlight a name and use the single arrows to move the name to the other side. The double arrow will move all. You can select multiple names at once by holding the control key down.
2) If sending to an external user, making the message private will keep other external users from viewing the note. The default is “Yes”.
3) To send a message to the phone of the recipients, change “Phones?” to yes.
4) Type in your topic and message and hit the “Send Message” button.

Summary
a) Finding Your Jobs
1) Select “Worklist” from your desktop.
2) You can use the filters to find the job(s) you need and click the “Go/Refresh” button to view the results of your search.
3) You can also view and attach documents as well as view the progress of each task.
4) Favorites can be managed and selected to make viewing your tasks easier.
b) Completing Tasks
1) Select a task by clicking the box in front of it and hit the 100% button.
2) Backdate a task or change the percent complete on a task by using the “Change Pct Complete” option in the “Check Item Action” menu.
c) Changing Dates
1) Open the job and click the due date of the task to be changed.
2) Select the date from the calendar or type it in.
3) Options default to move only dependant tasks, change if necessary.
4) Click the “Change Task” button.
d) Messaging
1) Click the message link for the job.
2) Highlight names in the “Select More Recipients” box and use the arrows to move names into the “Recipient List”.
3) Type in your topic and message and click the “Send Message” button.